 Skip to content

Help Center
Back
Hydraulic Brakes Replacement Guide
Follow this guide to replace the hydraulic brakes on your bike in the unlikely event one or more of these components become damaged or determined to be non-functional by Rad Power Bikes Product Support. Ebike brakes and components may wear out faster than would be the case for non-motorized bicycles, requiring more service.
The replacement hydraulic brake set consists of a brake lever, brake hose, and brake caliper. All pieces must be replaced together--do not disconnect the brake lever or brake caliper from the brake hose as this will result in loss of braking fluid and/or the introduction of air bubbles into the brake lines, leading to brake failure.
These instructions only apply to ebike models with hydraulic brakes. To replace mechanical brakes, click HERE.
Tools Needed:
- Flat-side cutters
- Isopropyl alcohol
- Paper towels
- Flat-head screwdriver
- 2 mm, 2.5 mm, 3 mm, 4 mm, 5 mm Allen wrenches
- Torque wrench
- A few zip ties
- Brake pad separator
- The brake pad spacer or a clean, large, flat-head screwdriver will also work
- The replacement hydraulic brake system
- Bike repair stand or lift
Remove the Old Hydraulic Brake Components
1. Get the bike ready for maintenance. Turn off the bike, remove the battery, and press and hold the Power button to discharge any remaining power. Before removing any components, take pictures of how they are currently installed, as you will need to install the new components in the same positions.
2. Locate the correct caliper. Locate the caliper you’ll be replacing. The rear caliper connects to the right brake lever, and the front caliper connects to the left brake lever.
Front caliper
Rear caliper
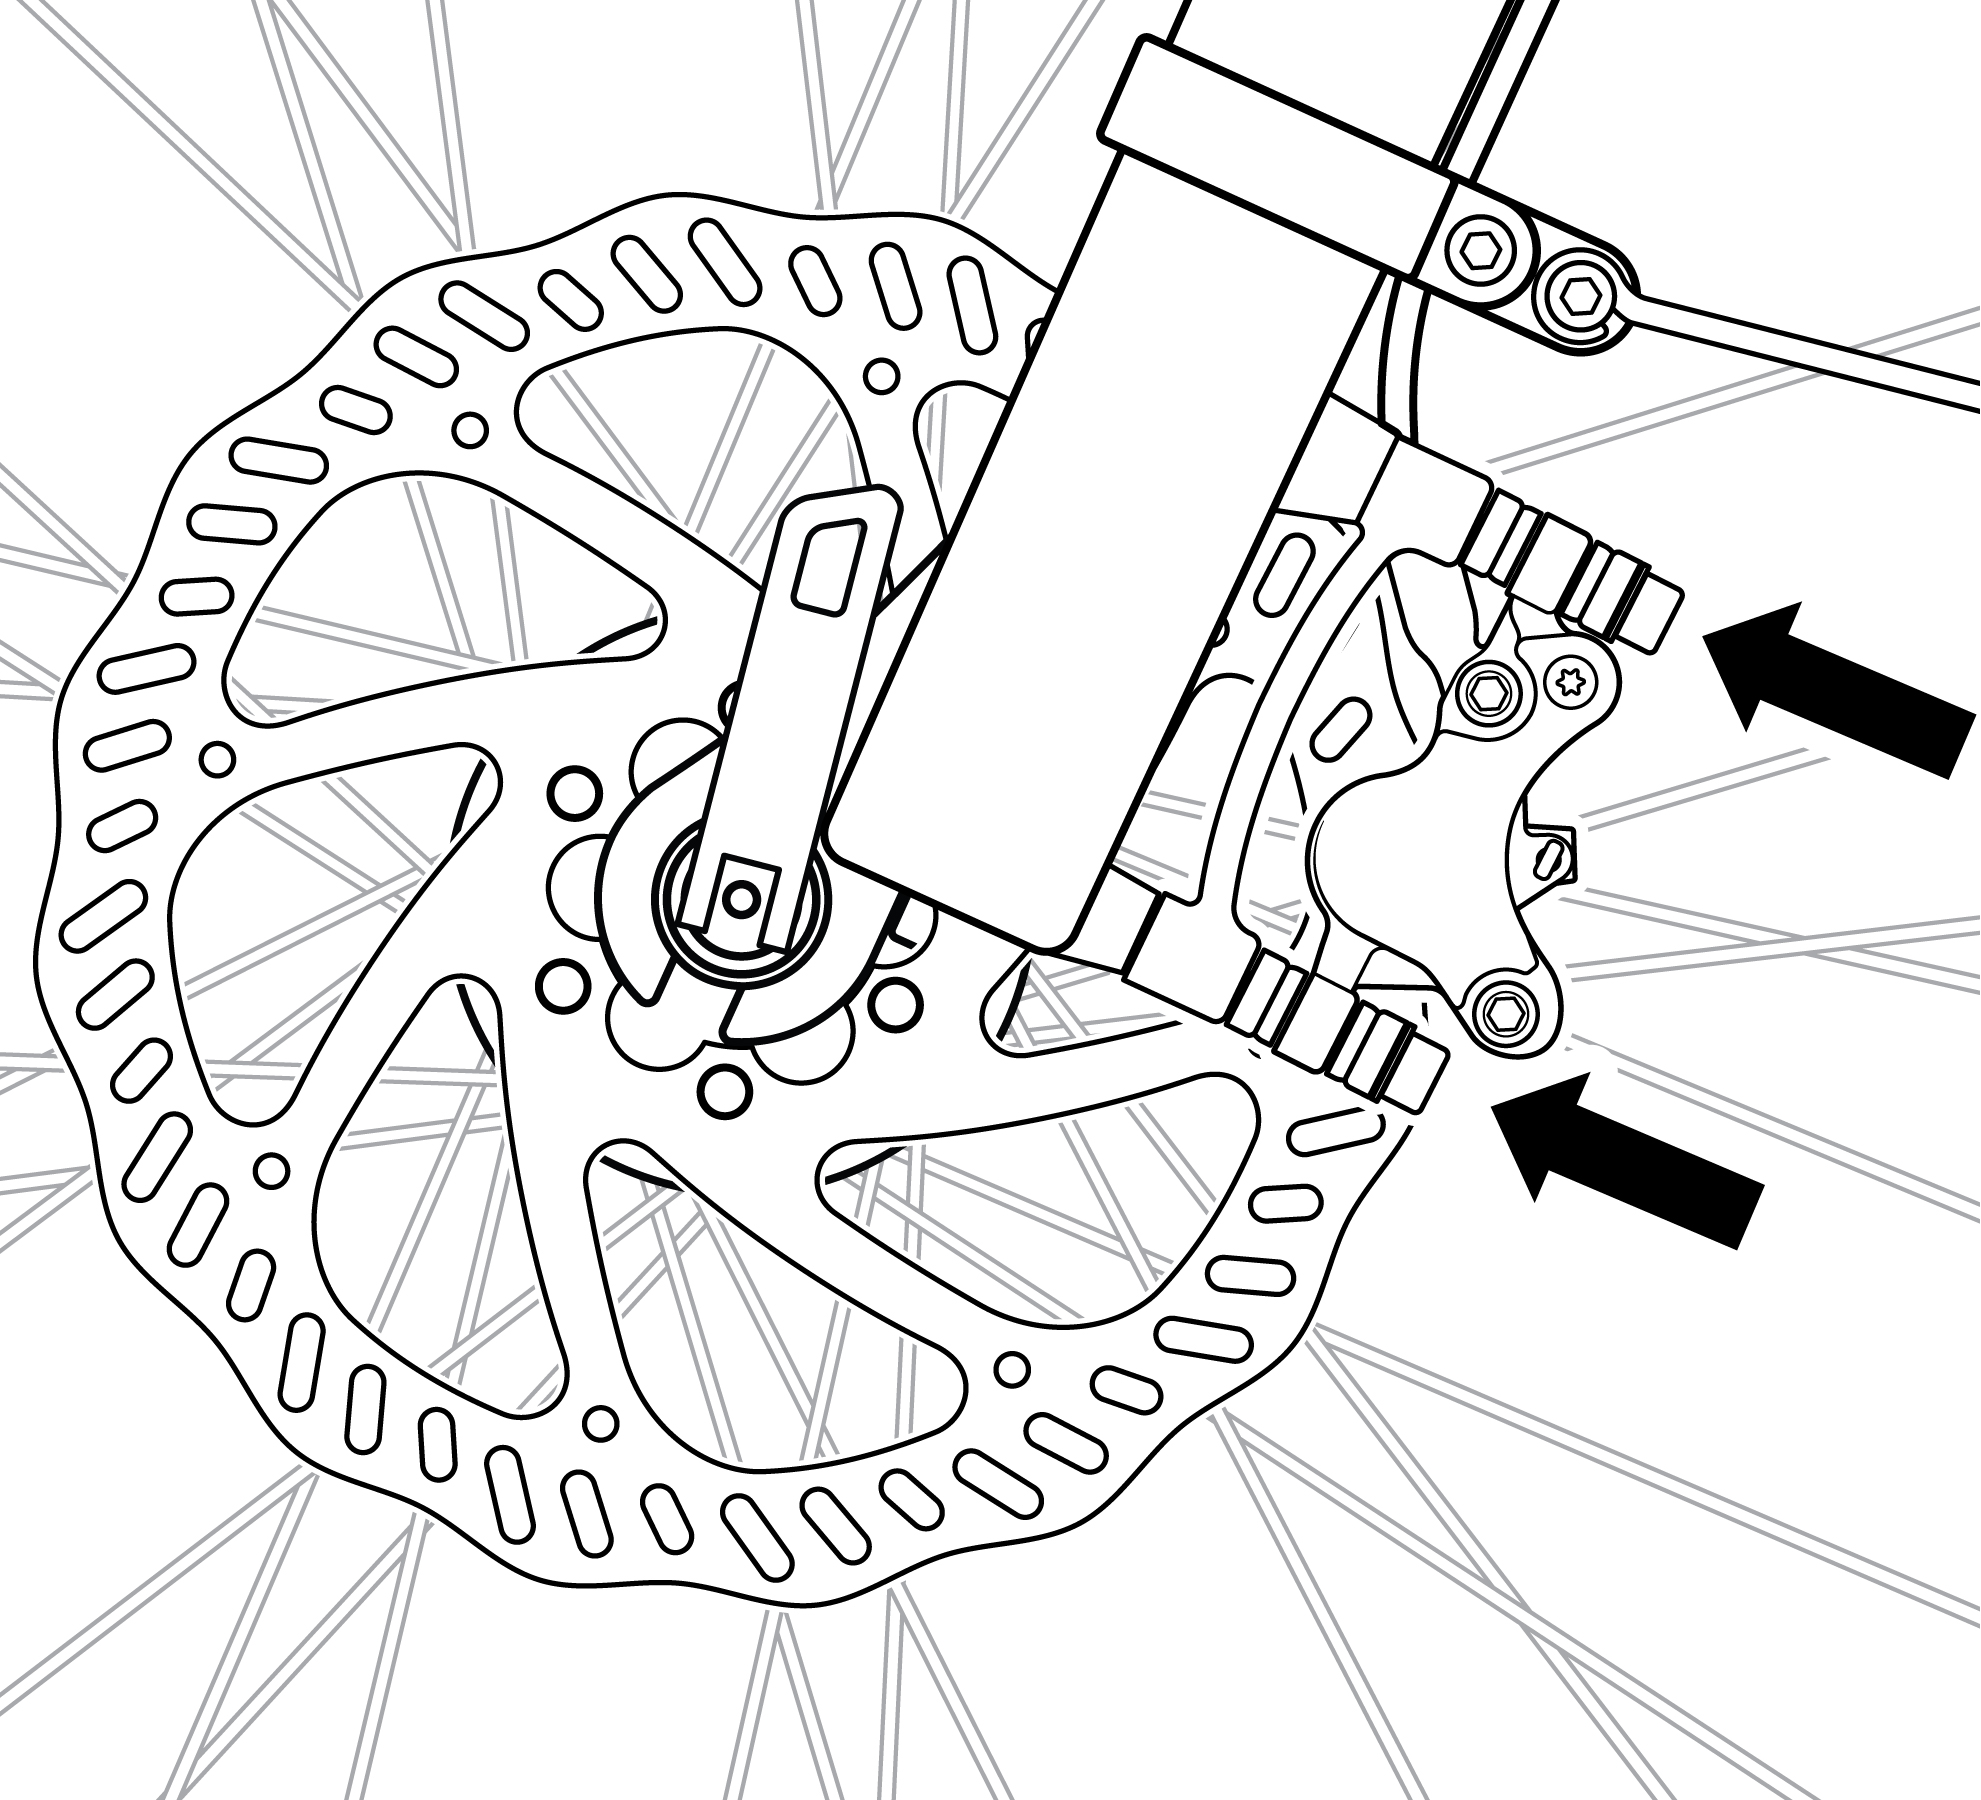
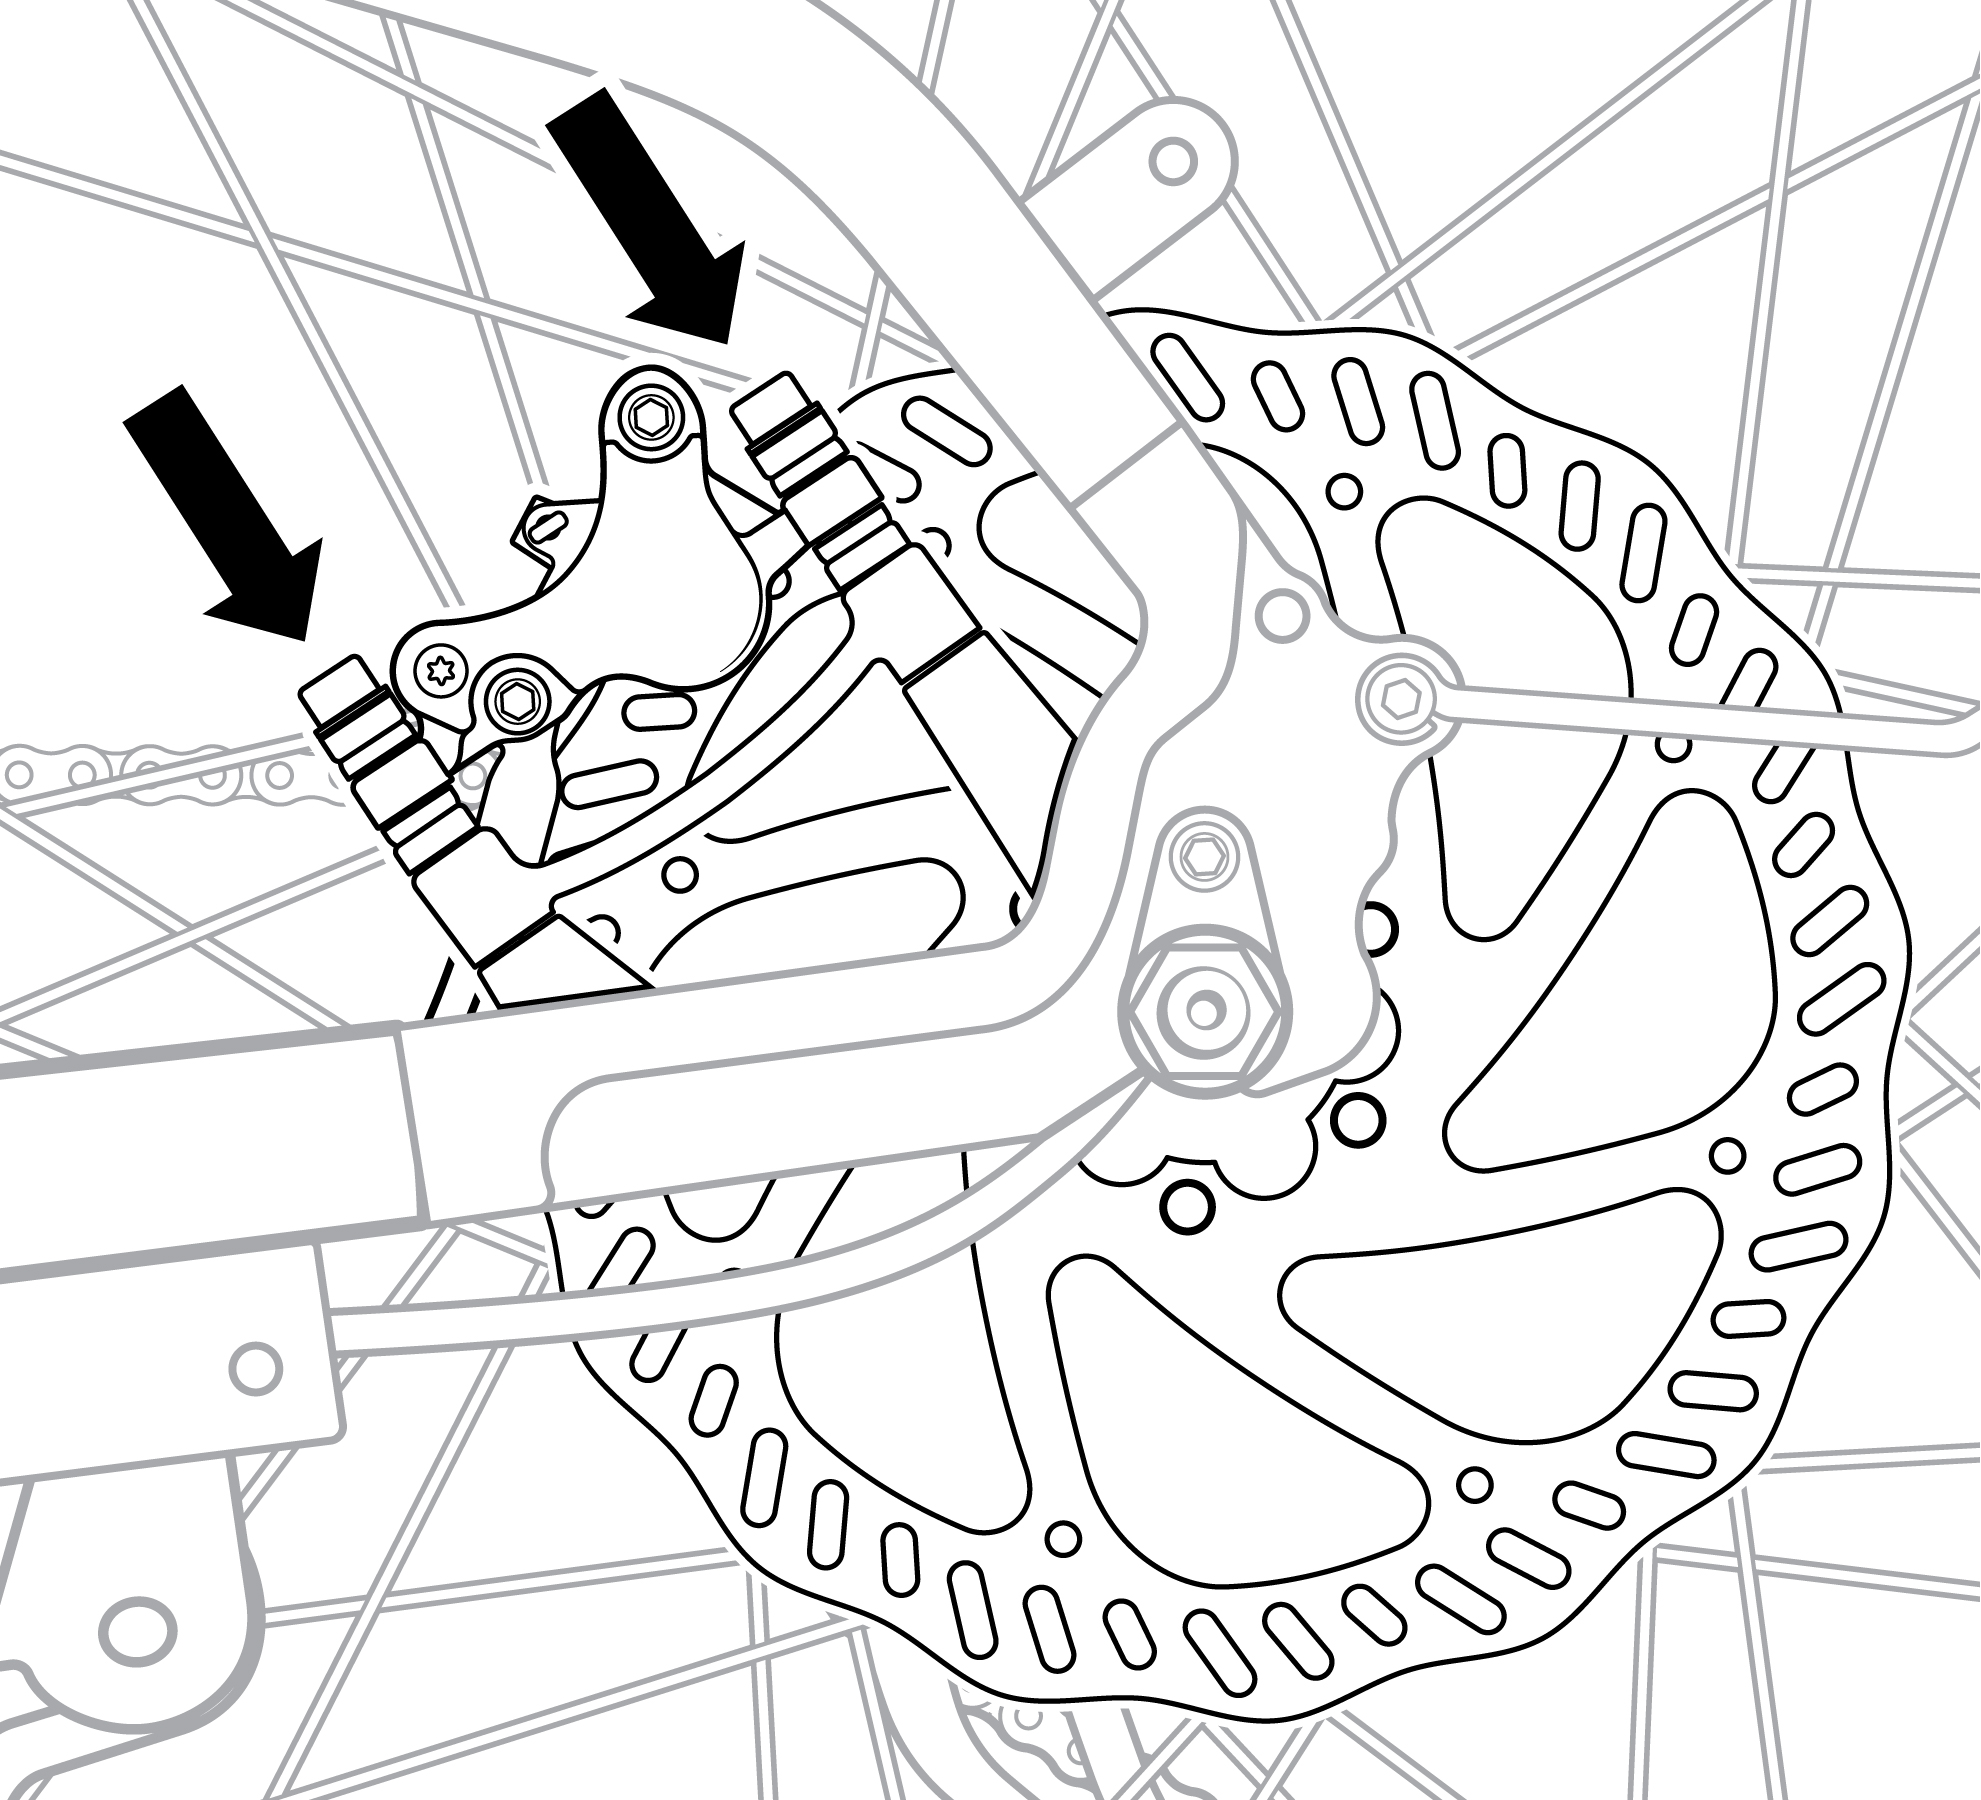
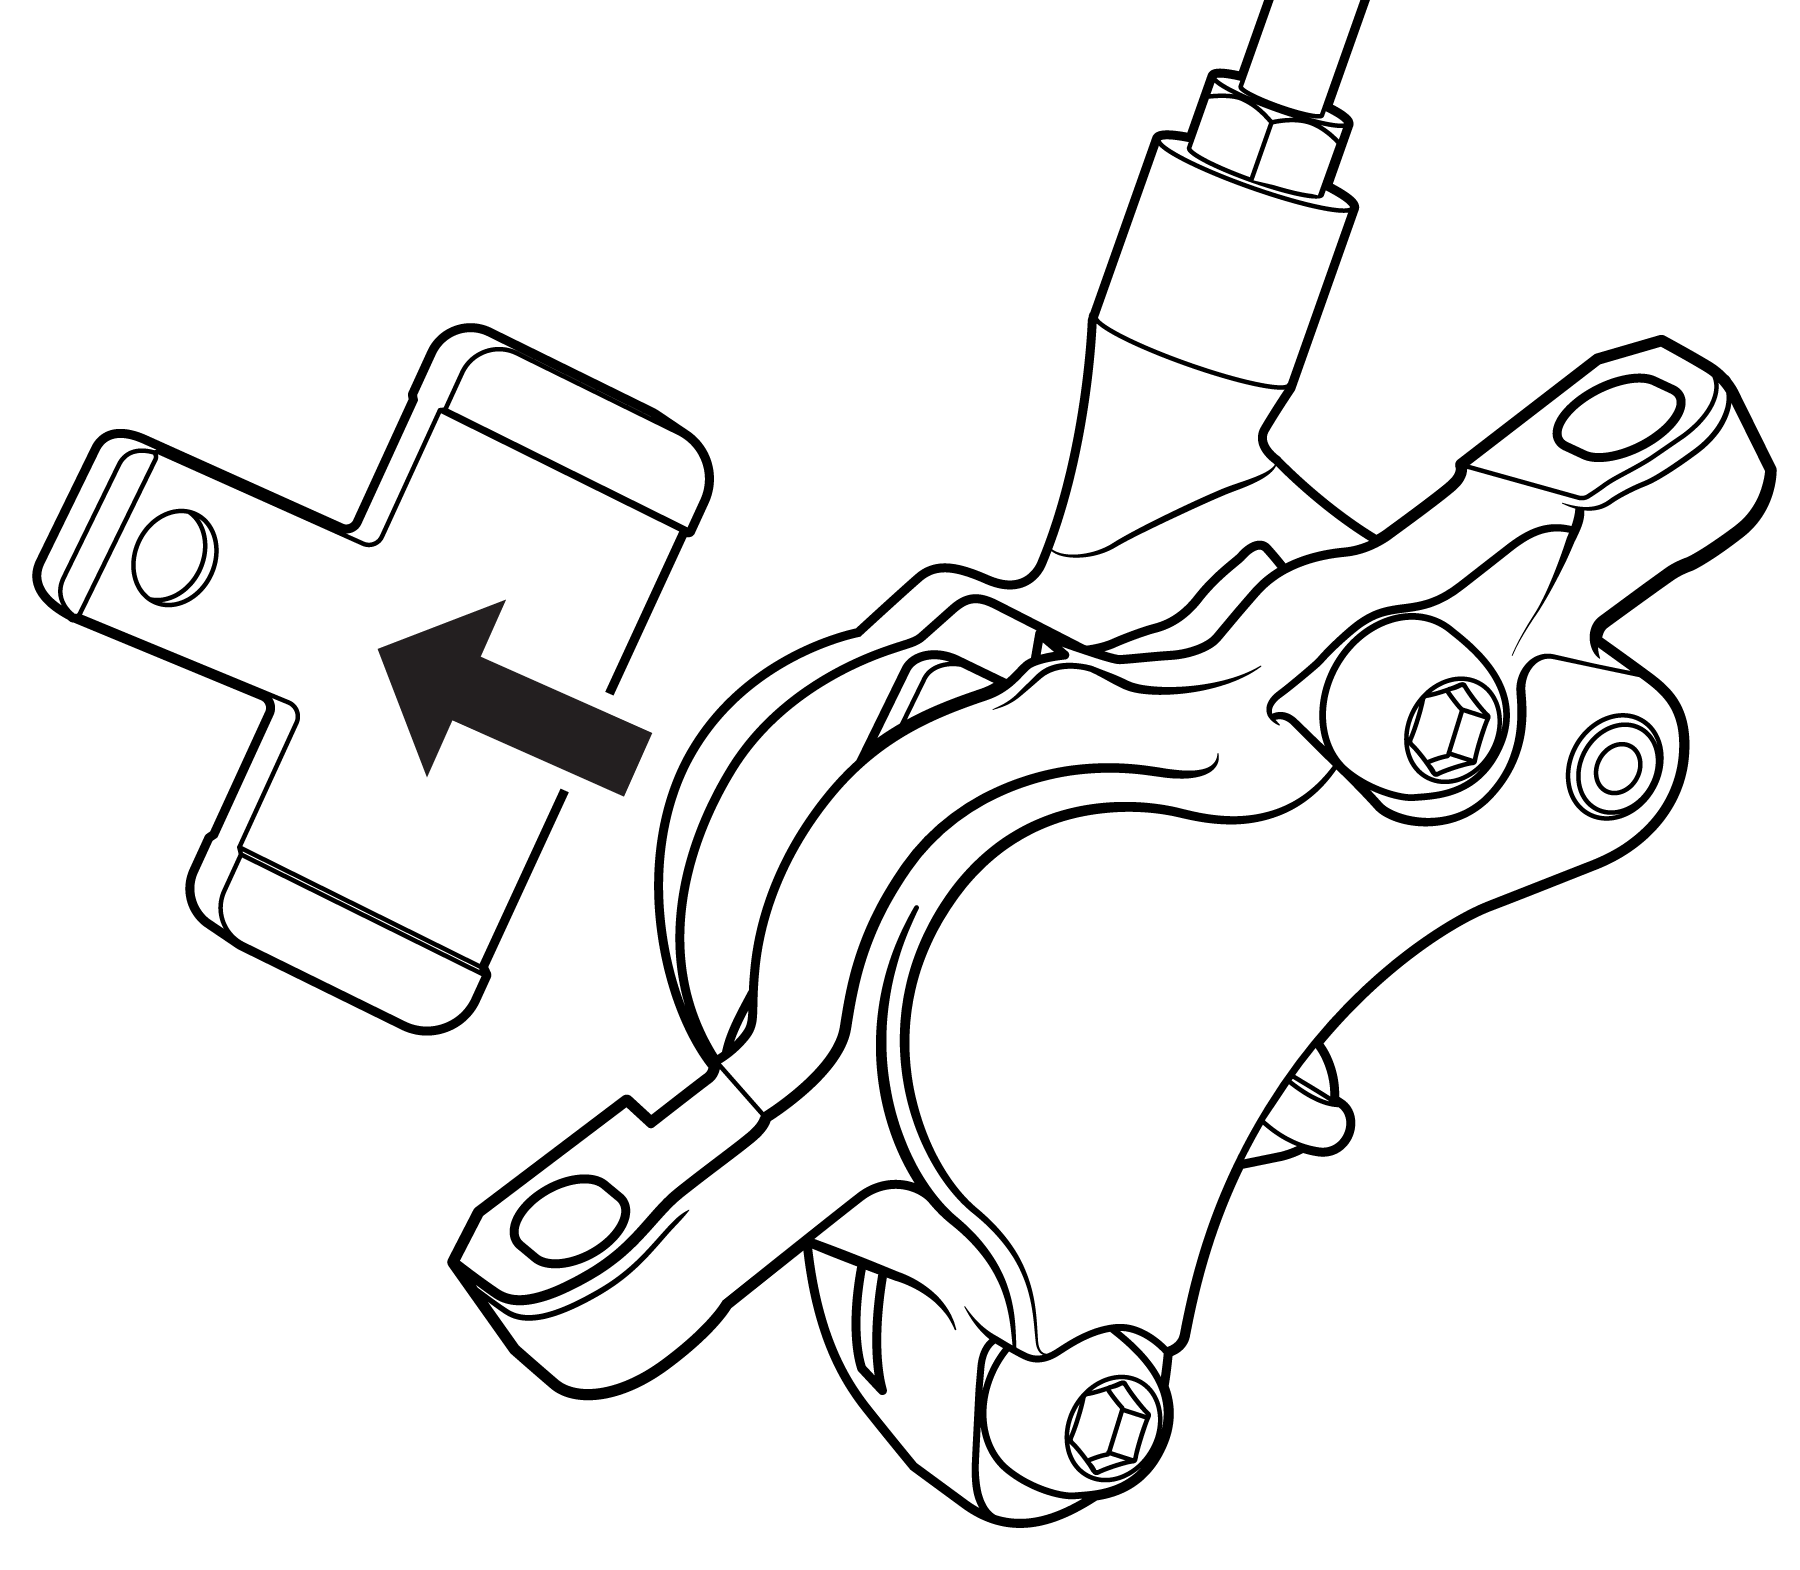
3. Remove the caliper. Use a 5 mm Allen wrench to loosen and remove the two bolts holding the caliper to the frame or fork.
4. Remove the brake hose. Trace the brake hose from the caliper and remove it from the bike.
- The front brake hose is attached to the fork by a clip and zip ties around the wiring harness. Cut the zip ties with flat-side cutters. Use a 4 mm Allen wrench to remove the brake hose from the clip.
- The rear brake hose is attached to the frame via the external cable cover and zip ties on the chainstay. Cut the zip ties, and use a 2.5 mm Allen wrench to partially unscrew the four bolts connecting the external cable protector to the frame. Pull the rear brake hose from underneath the external cable protector so that it hangs freely.
5. Remove the grip. There are two types of handlebar grips. Lock-on grips have a single bolt securing the grip to the handlebar. Standard grips do not have any bolts securing the grip to the handlebar. If the brake lever has a two-piece clamp design, you do not need to remove the grips or throttle, and can skip steps 5-6 and proceed directly to removing the brake lever.
- Lock-on grips are secured by a 3 mm Allen bolt. To remove these grips, remove the bolt with your 3 mm Allen wrench, use a flat-head screwdriver to remove the grip end cap, and then slide the grip off of the handlebar.
- For standard grips, use a flat-head screwdriver to remove the grip end cap, and then twist and pull the grip off the handlebar end. If needed, apply a small amount of rubbing alcohol in between the grip and the handlebar as temporary lubrication: carefully insert the screwdriver between the handlebar tubing and the grip, pry the grip away from the handlebar slightly, then use a paper towel or squeeze bottle to apply the alcohol in the gap.
6. Remove the throttle (if replacing the right brake lever).
- Unplug the throttle connector. Trace the cable from the throttle to the connector. Snip the zip tie and pull the connector apart, without twisting, to unplug.
- Loosen the throttle clamp bolt. Use a 3 mm Allen wrench to loosen the throttle clamp bolt.
- Remove the spacer and then the throttle. Slide the spacer and throttle off the handlebar end, making note of the spacer orientation, which is critical for reinstallation.
7. Unplug the brake connector. Trace the cable from the lever to the connector, then pull apart, without twisting, to unplug.
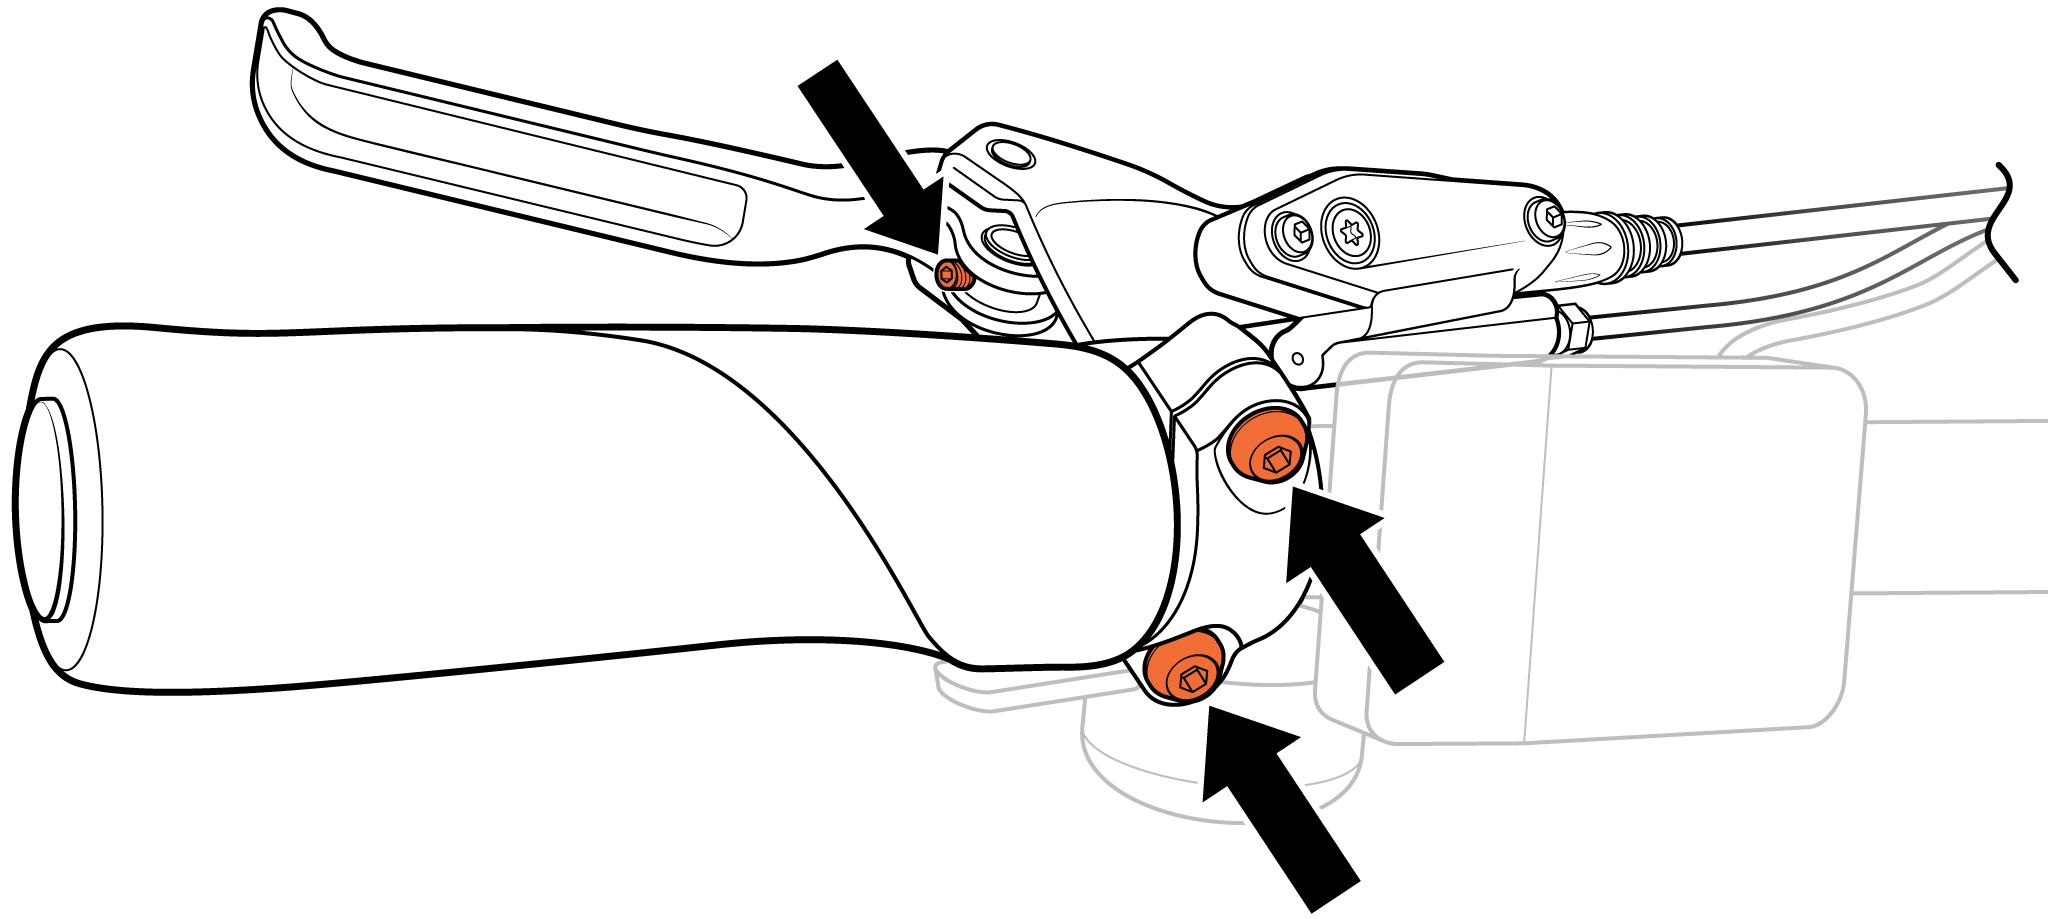
8. Remove the old brake lever. Use a 5 mm Allen wrench to loosen the brake lever clamp bolt, then slide the lever off of the handlebar.
If the brake lever has a two-piece clamp design, use a 5 mm Allen wrench to remove the two clamp bolts, and then remove the lever. Recycle the old hydraulic brake components according to local rules.
Brake lever with one-piece clamp
Brake lever with two-piece clamp
Install the New Hydraulic Brake Components
1. Install the new brake lever.
- Slide the new brake lever onto the handlebar end and adjust it to be at the same angle as the other brake lever.
- Thread the clamp bolt screw(s) by hand and then tighten with a 5 mm Allen wrench.
- Torque the bolt(s) to the value listed in your Owner's Manual.
2. Route and secure the brake hose.
- For the rear brake: Tuck the brake hose between the frame and the external cable protector. Tighten each bolt on the external cable protector, starting with the bolt closest to the bottom bracket. Ensure the edges of the external cable protector sit flush with the downtube.
- For the front brake: Secure the brake hose to the fork clip.
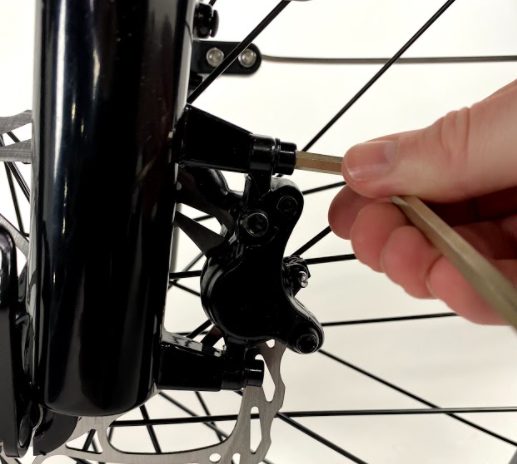
3. Remove the brake pad spacer (if applicable). Check the new caliper for a brake pad spacer and remove it from between the brake pads. If your caliper does not have a brake pad spacer, you can skip this step.
Do not squeeze your brake levers if your calipers are not on the brake rotor or don't have a spacer between the brake pads. Doing so can make your calipers press together tightly, which will require pulling them apart again using a brake pad separator or similar tool.
4. Adjust the brake pads. Use your brake pad separator to widen the gap between the brake pads as directed by the manufacturer.
5. Attach the caliper. Ensure the caliper hardware is oriented properly, referring to your photo from earlier. Partially insert the caliper bolts into the mounting holes. Use your 5 mm Allen wrench to tighten the caliper bolts until the caliper can no longer move side to side.
- Use your 5 mm Allen wrench to loosen both caliper bolts one turn at a time until the caliper moves side to side.
- With one hand, squeeze the lever of the brake you’re replacing. With the brake lever squeezed, retighten the caliper bolts until the caliper no longer moves side to side.
- Release the brake lever and spin the wheel to test whether the brake pads rub against the disc brake rotor. Check that both brake pads are parallel to the disc brake rotor.
- If your brake pads rub the rotor after aligning the caliper, slowly loosen one bolt at a time in quarter-turn increments and repeat the previous step until the brake pads no longer rub.
- Once the calipers are positioned correctly so that the wheel can spin freely between the brake pads, torque both caliper bolts to the value listed in your Owner's Manual.
6. Plug in the brake connector. Connect the brake connector cable from the brake lever to the corresponding cable feeding into the wiring harness. Line up the internal notches and pins, align the external arrows, and press together without twisting.
7. Reinstall the throttle, if it was removed.
- Slide the throttle and then the spacer onto the handlebar. The spacer must be properly installed between the throttle and the handlebar grip for the bike to operate safely. Use a 3 mm Allen wrench to tighten the throttle clamp bolt. Torque to the value listed in your Owner's Manual.
- Plug in the throttle connector. Line up the internal notches and pins (and external arrows) and press together, without twisting, to connect.
8. Reinstall the handlebar grip if it was removed. Orient the grip so the narrower end points toward the center of the bike.
For standard grips, apply a small amount of isopropyl alcohol to the handlebar. Twist the grip into place and reinstall the end cap. Once the alcohol dries, the grip must not move easily.
For lock-on grips, slide the grip on the handlebar and secure the bolt with your 3 mm Allen wrench. Torque to the value listed in your Owner's Manual.
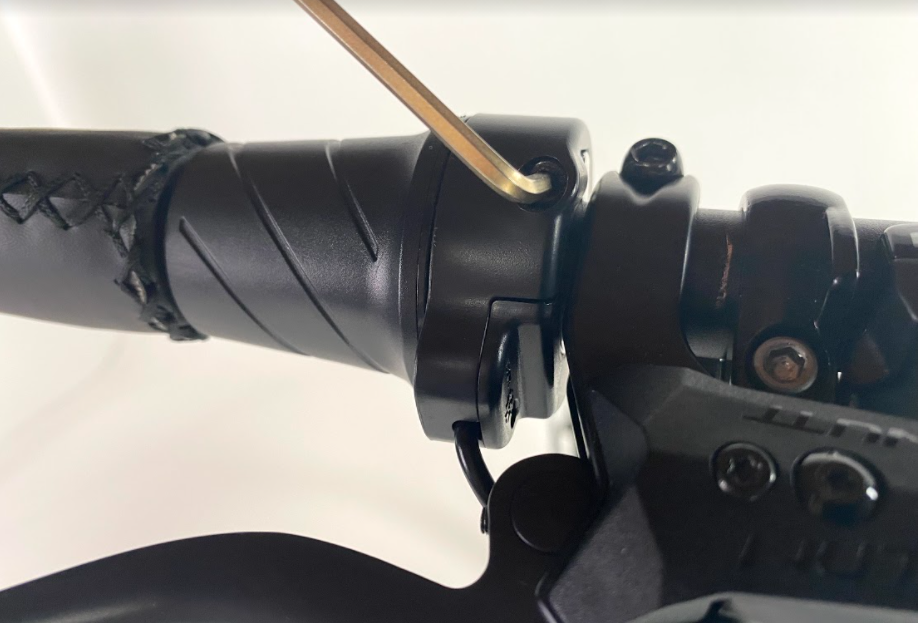
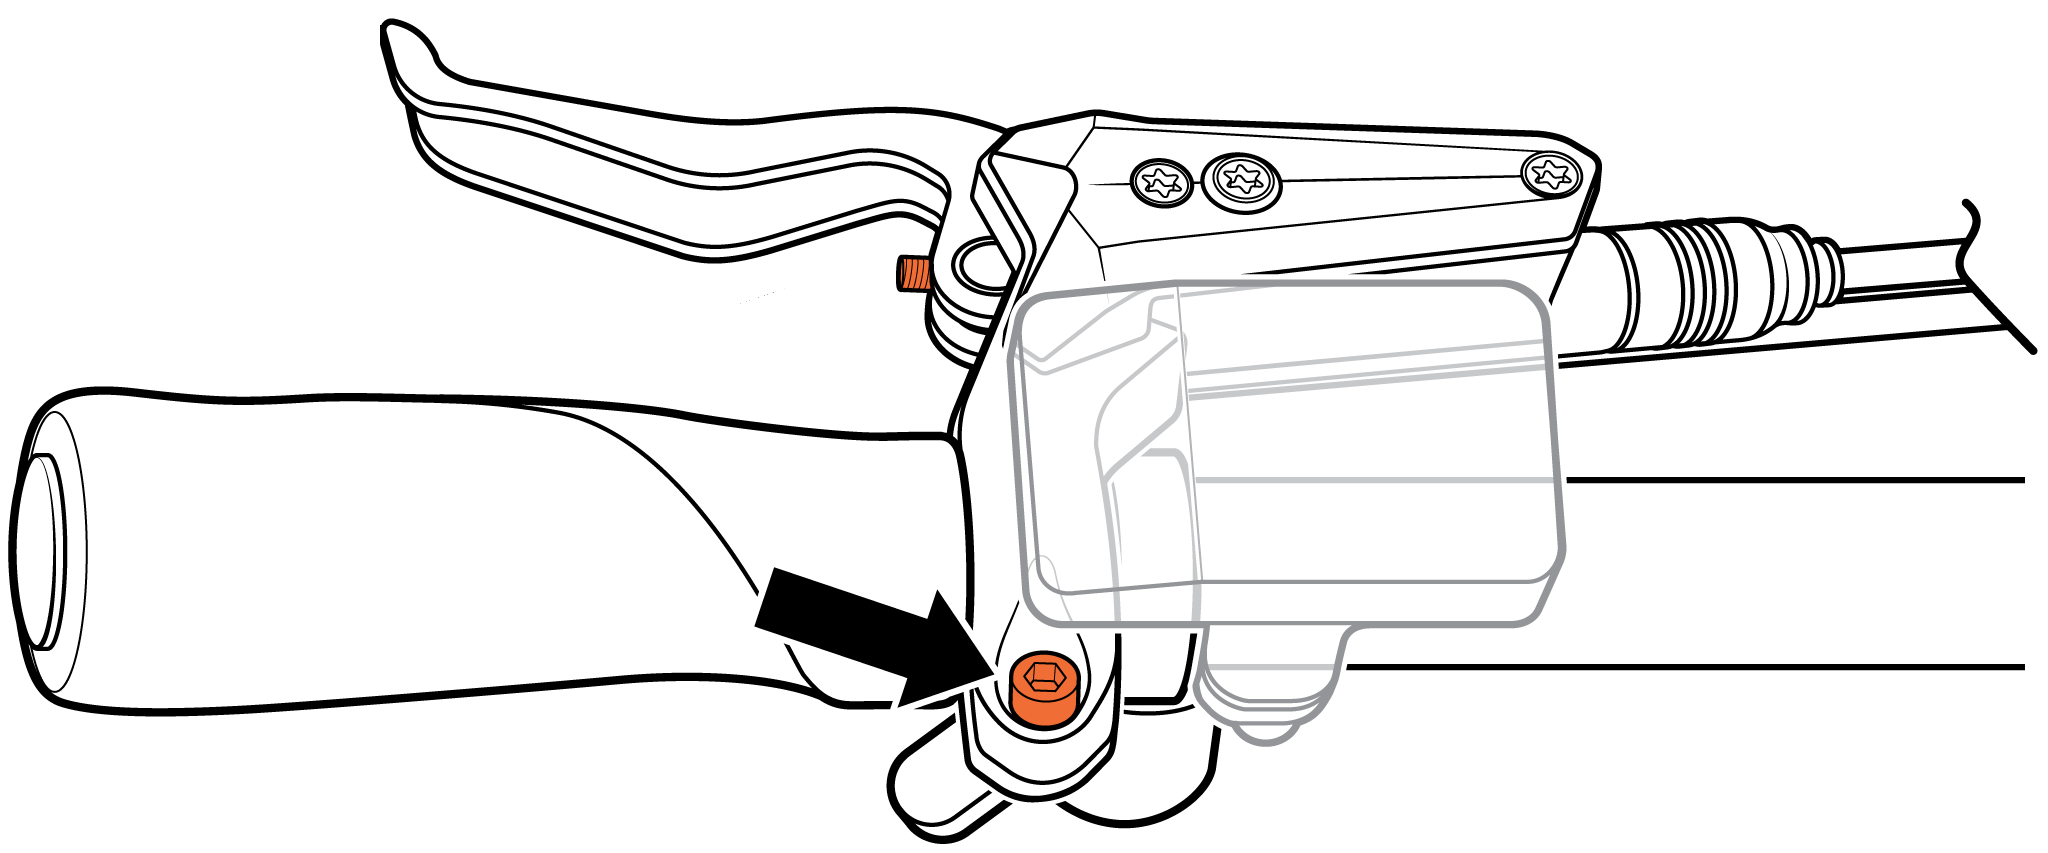
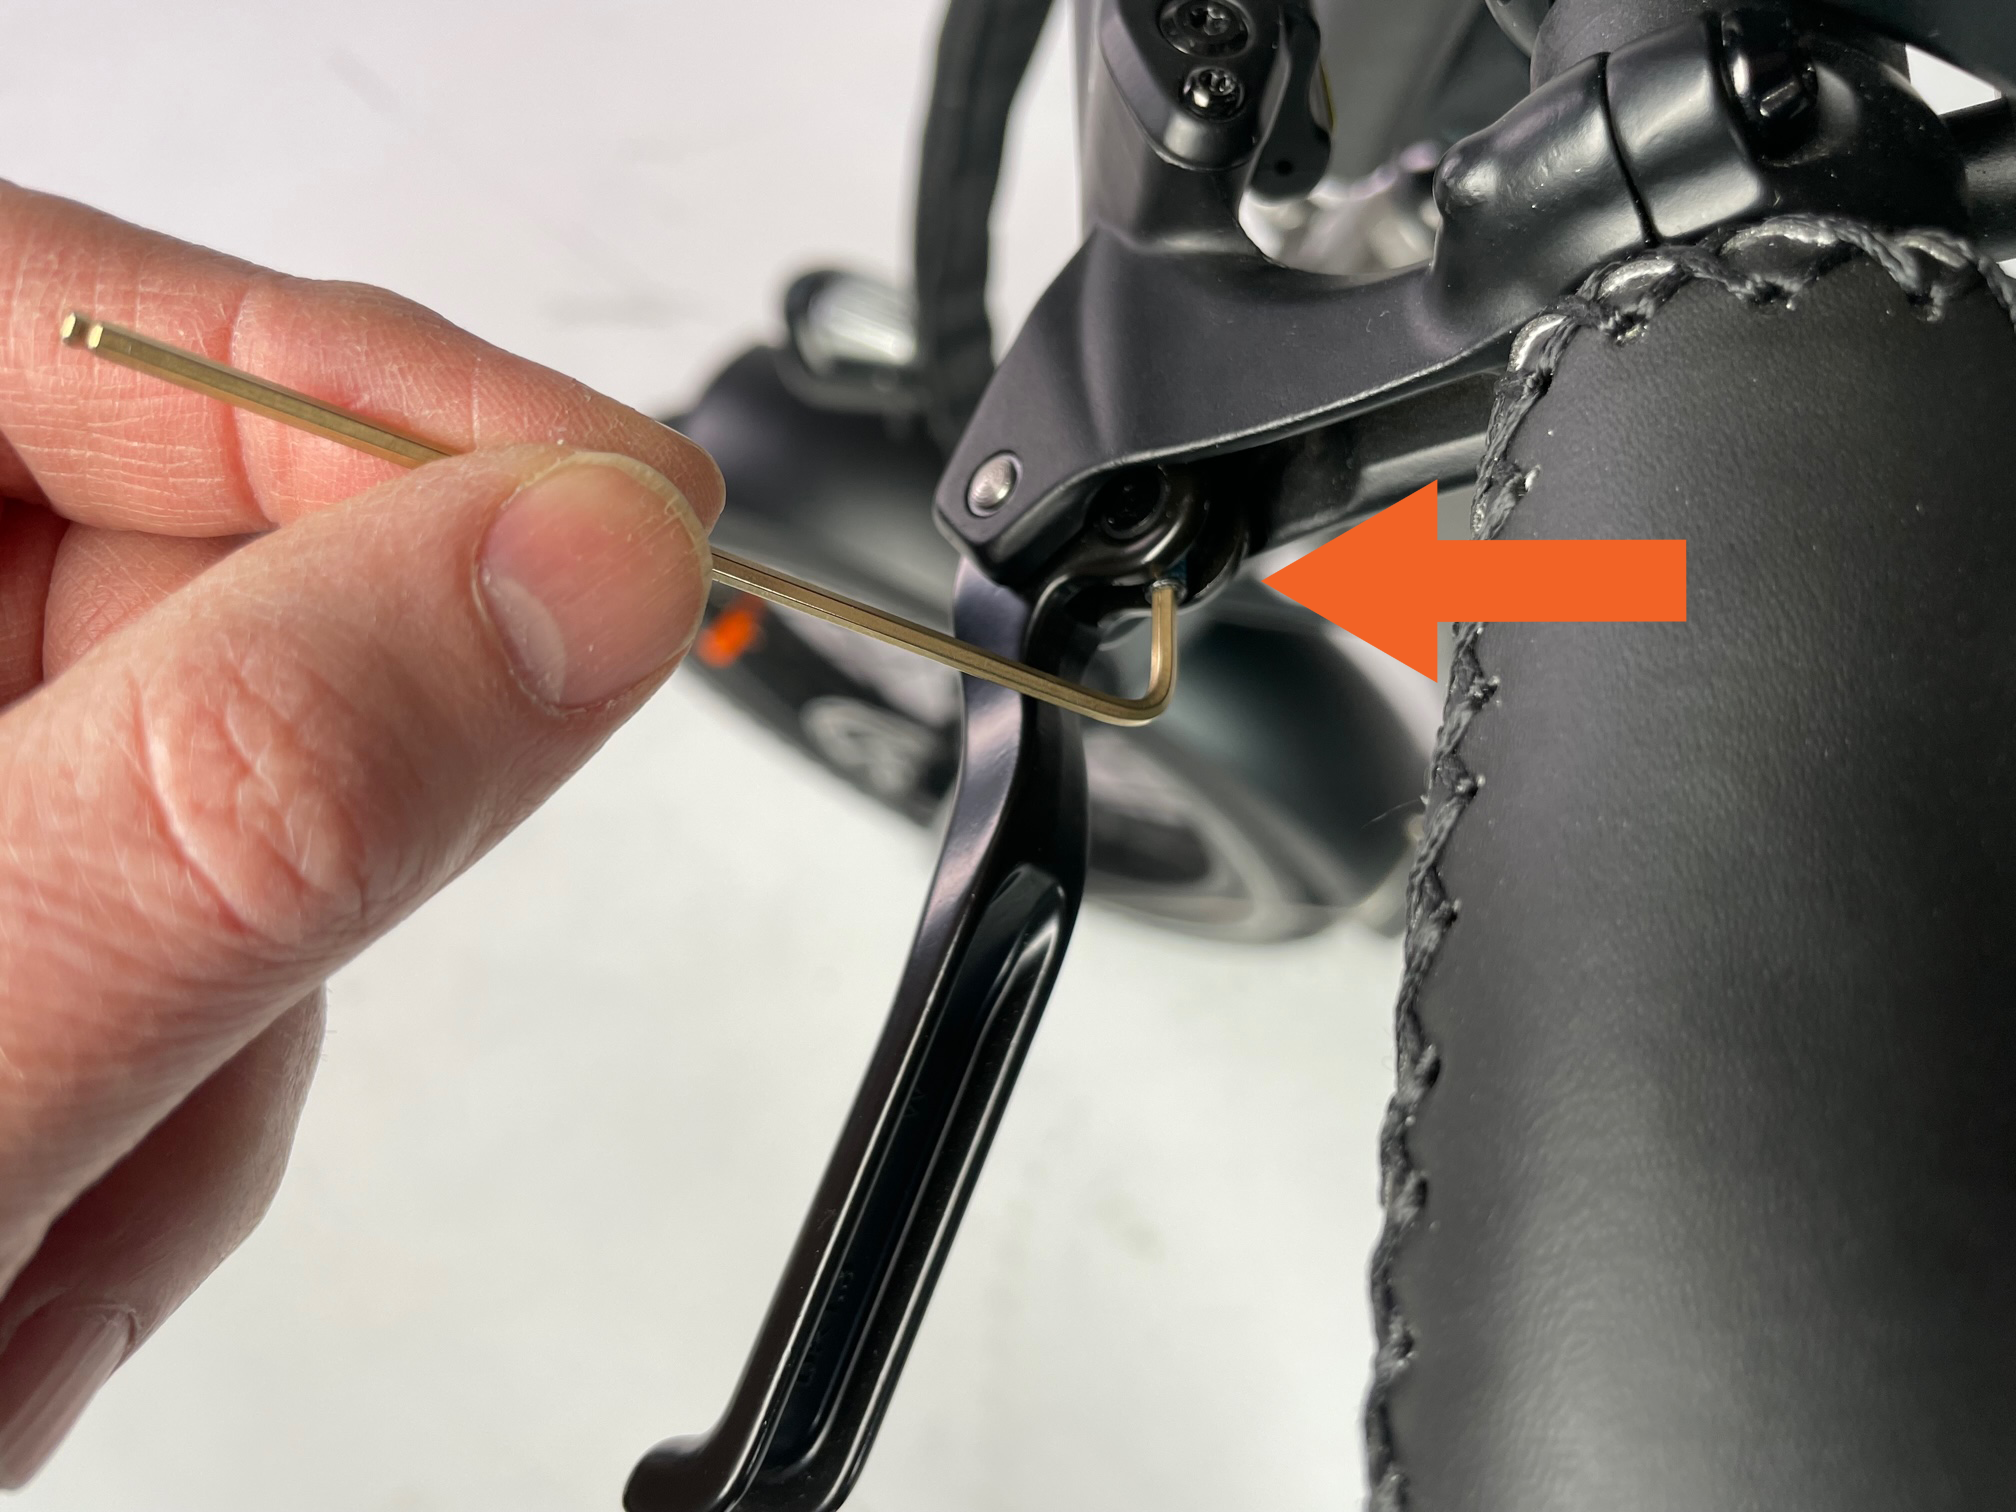
9. Adjust brake lever reach. Use a 2 mm Allen wrench to adjust the small screw on the inside of the brake lever in a counter-clockwise motion to tighten the lever reach. The lever reach must be comfortable for your hand size, but not so tight that there is no space between the lever and handlebar grip.
WARNING: A brake lever that can touch the handlebar grip when squeezed can result in the brake not pressing the pads into the brake rotor fully or at all, which means that the brake will not function properly or at all. Not being able to brake puts the rider at a high risk of serious injury or death. Always make sure that squeezing the brake lever does not cause it to touch the handlebar grip. Also make sure that a squeeze of the brake lever to halfway between the lever’s neutral position and the handlebar grip results in the brake pressing the brake pads against the brake rotor.
10. Replace snipped zip ties. Secure the cables with zip ties and trim them to be flush and smooth.
11. Reinstall the battery and test the bike fully before riding.